The Programmer's Guide to CellexalVR
1. Introduction
This guide will explain how to modify the code of CellexalVR to suit your needs. You will need some C# programming experience (or some similar object-oriented language), some Unity knowledge and a touch of computer science theory to follow this guide. You can find the code and assets at the github repository, and the documentation here.
To open up the project you need the Unity Editor. During CellexalVR's development there have been some engine upgrades. You will need one of:
- Unity 2021.3.0f1 if you are checking out a commit between 1a29d79 or later (recommended)
- Unity 2019.1.8f1 if you are checking out a commit between 9790228 and 5693e91
- Unity 2018.2.11f1 if you are checking out a commit between e54e6e4 and 2bc5a4c
- Unity 2017.3.1f1 if you are checking out a commit between bef690a and f71e241
- Unity 5.6.1f1 if you are checking out a commit between the beginning of time and cf7b0fb
We highly recommend you check out the latest version. Theoretically any newer version of Unity than those listed should work as well, try at your own risk.
You will also need R 4.0.0 or newer, as well as the CellexalVR R package. If you do not have the devtools package installed, install it with the command below in an R terminal.
install.packages("devtools")
Then install the CellexalVR R package. It is recommended to run the R terminal as administrator to do a system-wide install.
devtools::install_github("sonejilab/cellexalvrr")
You must also have pandoc installed for the html logging to work correctly, install it from here here.
From here you can freely experiment with the project.
All C# functions mentioned in this guide have their parameters omitted to reduce clutter a bit. You can click any of them to go to their documentation page.
2. Naming conventions
What most people refer to as point clouds or scatter plots, are called graphs in CellexalVR. The points that make up the graphs are called graph points. We try to keep functionality split among objects that there can be many of, like graphs and heatmaps, in 3 seperate classes each. The base class (Graph, Heatmap), a generator class (GraphGenerator, HeatmapGenerator) and a manager (GraphManager). Not everything has all of these, but the existence or absence of them should give you an idea of where functionality is located.
The multi-user functionality is split between two classes, the MultiUserMessageSender and MultiUserMessageReciever. The MultiUserMessageSender sends packages and the MultiUserMessageReciever that recieves them. The classes contain functions with almost the same names: the MultiUserMessageSender's functions start with "Send" and the MultiUserMessageReciever's functions start with "Recieve".
3. General project and script structure
The Unity project contains 2 scenes that CellexalVR uses. The Assets/CellexalVR_Main_Scene.unity scene is where almost everything in CellexalVR happens. It contains the desktop menu that is showned at the start, and the environment where the user performs the data analysis. The Assets/IntroTutorialScene.unity scene is the tutorial, it is for the most part a stripped down version of the main scene.
When you open the main scene, there will only be one gameobject with one script attached to it: the SceneBuilder. This script is only responsible for building the main scene. Go ahead and press "Auto-populate gameobjects" if all the fields in the inspector are not already filled in. Then press "Build scene" to build the main scene. After this you may remove the SceneBuilder from the scene. It is located in the Assets/Prefabs folder in case you need it again.
This script was written after painstakingly dealing with merge conflicts in the main scene, as all gameobjects that should be in the scene when the program is started would be there. Since then, we started saving everything as separate prefabs that the SceneBuilder script instead would instantiate for us.
The VR headset and controllers are located under the CellexalOpenXRRig gameobject. We use Unity's XR Interaction Toolkit for most of the interaction logic in CellexalVR and the Open XR Plugin for the hardware communication.
The InputReader gameobject holds the InputReader script, which reads the data from the CellexalVR R package and calls the appropriate functions to create graphs and transcription factor networks and so on. It also holds the ReferenceManager, a script that just holds references to other scripts to make them easier to access.
The Generators and Managers gameobjects hold children with the different generators and managers respectively. The generators are responsible for generating things such as graphs, heatmaps and transcription factor networks. The managers then handle operations that concern all objects of their respective type.
All buttons on the main menu (attached to the MenuHolder gameobject) derives from the CellexalButton script. This script holds the rudimentary functionality that such as swapping the button's sprite when it is hovered.
All the different keyboards in CellexalVR derive from the base class KeyboardHandler.
The RScriptRunner class contains the functions that call the external R scripts in the CellexalVR R package to generate heatmaps, transcription factor networks and more. This class is not deriving from MonoBehaviour and is thus not attached to a gameobject in the scene.
The multi-user functionality is split between the MultiUserMessageSender and MultiUserMessageReciever classes. These use the Photon Engine to send packages over the internet. The MultiUserMessageSender contains many functions that inform all other connected clients that something happened on their end, and the same thing should happen in all other clients' sessions and the MultiUserMessageReciever contains the function that repeats the same thing for a client.
There is a CellManager class that holds a list of Cell objects. The idea here was that if you have multiple graphs, they would each contain graph points that represents the same cells. An operation that concern a cell should affect all graphs, and thus that functionality was written in this class.
The values of all gene expressions are stored in an sqlite3 database. This database contains all non-zero expression values of all cells and all genes. The SQLiter gameobject contains the SQLite script that handles the queries that are sent to the database.
The folder structure when it comes to prefabs, materials and scripts is hopefully somewhat intuitive. The Assets/Prefabs, Assets/Materials and Assets/Images folders all have a similar set of folders in them like Graphs, Heatmaps, Menu and so on. The Assets/Scripts is organised after which namespace scripts are in. All scripts written by us are in the CellexalVR namespace and its subsequent nested namespaces.
4. The graph objects
Most things that users do in CellexalVR requires some interaction with the graphs, they are the centerpoint of the analysis. As mentioned before, what we call "graphs" are really point clouds. During CellexalVR's development, the graph class have changed and become rather complex. It underwent a major rewrite at the end of 2018, enabling us to load ten times as much data as before. This section will go a little deeper into how the graphs work.
4.1 How graphs are made
The graphs stem from simple text files with the .mds extension, one file for each graph, where each line contains the name of a cell, and an x, y and z coordinate. The InputReader class calls the MDSReader.ReadMDSFiles() function which reads every file containing coordinates and calls GraphGenerator.CreateGraph() once and then GraphGenerator.AddGraphPoint() once per cell that should be added. The position of each graph point is saved and once every line is read, GraphGenerator.SliceClusteringLOD() is called. This function recursively divides the graph into an Octree which will be very useful later. We'll go more into detail about the Octrees in section 4.4, for now, just know that they divide the graph into different parts.
The goal is now to create meshes that the user can look at. We start with only the mesh of a single graph point and want to duplicate it once per point in the graph and combine all the meshes into a single mesh. A mesh consists of vertices (points in space) that is connected in pairs of three. Each three connected vertices forms a triangle whose surface is what can be seen by the user. You can think of the vertices as the "corners" of the 3D model and the triangles as the surface. Each vertex also holds some additional information, such as a normal direction and a texture coordinate, we'll talk more about those later. A mesh in Unity can only contain 65,535 vertices, so unfortunately we can not always put the entire graph into one mesh. The number of graph points we can put into one mesh is equal 65,535 divided by to the number of vertices in the mesh that should be used for each graph point. When the graph was clustered into the Octree, we saved which largest clusters contained less than that number of points. The meshes are made using Unity's Job system in order to utilise some multithreading. Most people that run CellexalVR should have powerful enough CPUs that this should make a difference. The meshes have to be combined vertex by vertex and triangle by triangle, which is done in GraphGenerator.CombineMeshesJob.Execute(). It takes the positions of all points in each cluster and a mesh of a single graph point and assembles one mesh of a cluster each iteration by just duplicating the single graph point mesh at the correct positions. It also calculates the texture coordinates that we mentioned earlier.
4.2 Coloring graph points
Texture coordinates, or UV values/coordinates, are tied to the vertices of a mesh. Each vertex has a two-dimensional texture coordinate with the x and y coordinates between 0 and 1. These simply tells us which pixel of a texture each vertex belongs to. A x/y coordinate of 0 gives us the bottom/left pixel and 1 gives us the top/right pixel. They are used to tell a computer how a texture should be stretched and folded around a complex three-dimensional object to be displayed correctly. It is basically the same problem as trying to project the Earth's spherical surface onto a flat piece of paper, or rather the opposite, trying to wrap a piece of paper around a globe. No matter how you do it, some parts of it must be distorted in some way. We can imagine our real world coordinates as our texture coordinates in this case.
The texture coordinates of the graphs' meshes are set according to their clusters. An empty texture is created that is the size of the maximum number of points per cluster times the number of clusters. Each row in this texture will correspond to a cluster, and each pixel in that row will correspond to a graph point. This often makes the textures slightly larger than they have to be, as all clusters won't have the maximum amount of graph points that could possible fit in one cluster, but it makes working with them a bit easier. By setting the texture coordinates on all vertices that makes each graph point to the same pixel, we can color just one pixel in a single texture and the graph point will get that color.

But it doesn't end there, we have additional information that we want to display using the graphs. For example, when a user selects some cells, those cells should become transparent until the selection is confirmed. For this we will use a second texture, and let the first texture emulate a second set of texture coordinates pointing to a pixel in our second texture. An example of the second texture is shown to the right, with some text that explains which part is meant for what. The texture is only one pixel tall, and 256 pixels wide. These numbers are not chosen out of sheer coincidence. A color in a computer is typically represented using three 8-bit numbers. One number for how red the color is, one for blue and one for green. Together you can form 256 * 256 * 256 = 16,777,216 colors with only these three handy numbers. We will focus on the number for red, if we let this number tell us how far to the right in the second texture we should go, and just color the graph point to the color of whatever pixel we land on, we can use the green and blue number for other things. This means that if the second texture looks like the image to the right, where we have 30 colors for gene expression and 23 selection colors; if the red number is between 0 and 29, we will color a graph point using one of the gene expression colors. If it is between 30 and 52, we will color it based on a selection color. The colors to the far right are reserved for the zero expression color on the 255th pixel and the graphs default color on the 256th pixel. The middle of the texture is currently unused but may be filled with more gene expression or selection colors. The texture is automatically generated by CellexalVR in GraphGenerator.CreateShaderColors() when the program is started or when the colors in the settings menu are changed, it is not meant to be created manually.
The idea here is that during a session of analysing data in CellexalVR, graphs will change their colors many many times, but only between some pre-definded set of colors. Typically, a gradient of gene expression colors and some set of colors for groups within a selection. So while there are over 16 million possible colors we could chose from, a user will only stick to a handful. After all, the colors are meant to serve a purpose, they hold some biological meaning behind them.
This does lead us to the limitation that we can only use a maximum of 256 different colors in our visualisation. But it is easily extended by adding a second row to the second texture and letting some bit in the green or blue number decide which row it should look at. So far, we have not encountered a situation where a user may want more than 256 unique colors. It is very hard to come up with 256 unique and easily distinguished colors anyway.
All of the texture lookups and other math is done in the CombinedGraphpoint.shader shader.
4.3 Masks
During 2023 the Selection class was created as a result of a rewrite to how graphs were colored, which introduced masks. To understand them, we need a quick recap of the last section. The graph points' shader uses two textures to determine a graph point's color. The red channel in the first texture determines which pixel in the second texture we are using for the graph point's base color, and the green and blue channel in the first texture can be used to encode other information. So to recolor a graph we need to manipulate the first texture, and most of the time just the red channel.
One thing we found users doing often was to swap a graph between two or more colorings to compare them. This could be done through the heatmaps by hovering the laser pointer attached to the controller over the colored bar on top, representing the selection groups that the heatmap was made from, and also featuring categorical data supplied when the dataset was loaded. This feature ended up working extremely slowly and degraded the whole program's performance to a point where larger datasets would freeze the whole program for several seconds at a time. The worst part was that users often accidentaly hovered this colored bar without realizing and wondered why everything suddenly froze.
The problem was that every time the bar was hovered, the first texture in the graph point shader needed to be rewritten. This was done through calling Texture2D.SetPixel() once for every pixel that needed to be written. Typically we also needed to do some dictionary lookups, and/or construct a list of graph points we were interested in et.c. This was a very slow process when graphs could have up to millions of points in them.
The solution was to simply not call Texture2D.SetPixel() and instead use Unity's NativeArray struct. This struct exposes a native buffer of memory to us, which is extremely fast to operate on. And as it turns out, the Texture2D class has the perfect method for us; Texture2D.GetRawTextureData(). This method returns a NativeArray pointing to the texture's data on the CPU. Most textures in Unity have two copies, one lives on the CPU and one on the GPU. The one on the GPU is what is actually used to render stuff, but we can only really manipulate the one on the CPU, and then tell the GPU to copy that over to its memory using Texture2D.Apply(). Furthermore, NativeArrays are what Unity's Job system uses, which allows us to incorporate some multi-threading easily, where it is applicable.
When data is loaded into CellexalVR, we can now pre-compute the texture that would be used to color a graph by what we call attributes, which is categorical data, this texture is what we call a mask. The textures were then saved on the disk together with the data, so they didn't need to be re-computed every time the same dataset was loaded. We also save masks whenever a user makes a selection. When we then want to color a graph by some attribute, we can request that attribute's pre-computed texture's raw data, the NativeArray, and loop over it to recolor the graph point shader's first texture, also a NativeArray. This whole rewrite reduced the time it took to recolor large graphs from several seconds to a few miliseconds at most.
The attribute's masks are saved in each graph object in Graph.attributeMasks. When a selection is made all the groups are turned into separate masks as well, saved in Selection.groupMasks.
4.4 Selecting graph points
The Octrees I mentioned earlier serve one more purpose other than neatly clustering the graph and helping us make meshes. The main reason for the Octrees is the selection tool in CellexalVR, a key feature that allows users to use the VR hand controllers to select individual points in the graphs for further analysis. Selecting points is done by letting the selection tool touch the graph points, the selection tool is atteched to one of the controllers, so users basically move their hand through the data to select groups within it. Before the major rewrite of 2018, which introduced the Octrees, the collision detection was done by putting one collider on the selection tool, and putting one collider on each graph point. Everytime the controller hit a graph point a function called OnTriggerEnter would be called and we could used that to identify which graph point had been selected by the user. This relied on Unity's built in collision detection which uses a much more advanced algorithm than what we need in this case. It was working very well until we tried to load datasets with more than 20,000 cells or so. The graphs started being so dense that the selection tool would hit too many colliders at once, and this was reflected in degrading performance. In VR it is important that the framerate is quite high at all times, so any degrade in performance is important to try to eliminate.
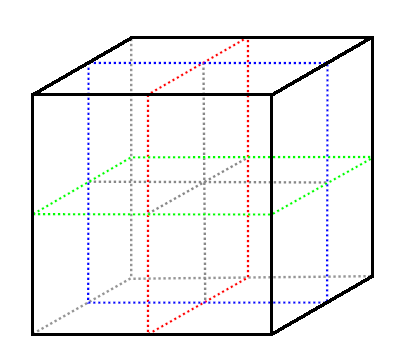
Today, the graphs use their Octrees to very efficiently find which points are selected. The Octrees are created by initially putting all graph points in one cluster, in the shape of a cube, that contains the entire graph. This cube is then split into 8 cuboids, illustrated in the image to the right. The split can be pictured as making 3 cuts through the cube (the red, blue and green plane in the image to the right) where the middle point is the mean position of the points in it, and each of those cuboids are then split into 8 smaller cuboids and so on until there is only one point in each cuboid. Each cuboid knows of its parent cuboid (the cuboid that is was created by) and its children cuboids (the cuboids that it created when it was split into 8). Each cuboid that only contain one point also knows which point it contains, the other (larger) cuboids don't know which points they contain. This leaves us with one root cuboid, the cube we started with, which contains all the points, and its many children and grandchildren and so on. Given a position in the graph, we can now start with our root cube and check which of its children the point is inside, then poll that cuboid for which of its children the point is inside and so on until we reach a cuboid with only one graph point inside. That is the graph point at the given position. If we do not end up on one of the cuboids that contain only one point, then no point was at our given position. Each cuboid is shrunk to the smallest size it may be while still containing all its points at the time of building the Octree, and empty cuboids are removed.
While that sounds wonderful, it does not solve the problem entirely. The selection tool is unfortunately not a single point, it is a three-dimensional shape. Luckily for us, some other smart people have already figured out how to solve this. I won't go in to too much detail here, but the Minkowski difference can be used to check whether or not two arbitrary shapes intersect. The Minkowski difference is however rather expensive to calculate for arbitrary three-dimensional shapes, but we can overcome this by remembering that we don't have to use arbitrary three-dimensional shapes. Our Octree consists of only cuboids, and through Unity we can get another cuboid, the selection tool's minimum bounding box. A minimum bounding box is defined as the smallest cuboid that an object can fit in. Checking if two cuboids intersect is trivial, as long as they are aligned with each other. Aligning the selection tool's bounding box with the Octree is not difficult either and grants us a slightly larger cuboid that the we know the selection tool is inside. Now we have reduced the problem to comparing the coordinates of the cuboids' corners. This lets us find the rough part of the graph where the selection tool is. Now we need something more precise to determine if a point is inside the selection tool. For this we have to rely on a more computationally heavy operation than comparing some coordinates.

The point in polygon algorithm will solve the remaining part of problem. Unity features what is called raycasts. A raycast is pretty much a laser that we can shoot from a given point in a given direction and see if it hits a collider. Raycasts in Unity only hits the outside of colliders, which is very useful to us. If a graph point is outside the selection tool, and we fire a raycast from the graph point towards the selection tool, it will hit it. However if the graph point is inside the selection tool, the raycast will pass right through the selection tool's collider and not hit anything. We can set up the raycast so that it ignores every other collider in the virtual environment so we don't get any false positives. Note that this only works if the selection tool is a convex polygon. A convex polygon is a polygon that doesn't have any holes or indentations. On concave colliders the raycast could exit the collider and then hit it again, meaning we might not find points that are actually inside the collider. In the image to the right, two polygons are showed, the one to the left is convex and the right is concave. A raycast, shown with a green arrow, is shot from a point inside both polygons. In the left convex polygon, the raycast can not enter the polygon after exiting it, no matter which direction it is shot. But in some scenarios, this can happen to the concave polygon to the right.
And that's it! Now we can put any convex three-dimensional shape in any position and get a list of graph points that are inside the shape by calling Graph.MinkowskiDetection(). This new way does not bottleneck CellexalVR and lets us have very dense graphs with up to about 200,000 points without any performance degrading. As a last side note I'd like to point out that the current bottleneck in CellexalVR when it comes to loading more cells is rendering the graphs. We can reduce the resolution of the graph point meshes and render up to 1,000,000 points but then performance starts taking some hits.
5. The menu systems
This section aims at explaining the thought process and design of the menus in CellexalVR. There are two main "types" of menus, the menu that is attached to one of the VR hand controllers, and then what we call "environment menus". The environment menus include the legend, box plots, heatmaps et.c, anything that has some clickable buttons or interactive elements and are not part of the controller-menu.
5.1. Raycasters and raycastables
Our interaction solution is based off Unity's XR Interaction Toolkit. This handles communication with the hardware and some classes to start off with. To expand it we have written two classes that CellexalVR's menu's and interaction logic is all based on. CellexalRaycast and CellexalRaycastable. As mentioned in the previous section, a raycast is a "laser" that we can shoot from a target, in a specified direction, and see if it hits anything. Any gameobject with the CellexalRaycast component will raycast once every frame, and if it hits a gameobject with the CellexalRaycastable component, it will call the appropriate functions on the gameobject it hit. The CellexalRaycastable has three UnityEvent that can be invoked. OnRaycastEnter is invoked when a CellexalRaycast first hits this CellexalRaycastable, OnRaycastExit is invoked when a CellexalRaycast no longer hits this CellexalRaycastable. Finally, OnActivate is called when the CellexalRaycast is hitting this CellexalRaycastable and the appropriate input action is performed, usually the right controller's trigger button.
The main classes for constructing buttons that can be interacted with are then, CellexalButton and ClickablePanel, these both derive from the CellexalRaycastable class. CellexalButton is a class that is meant to be used with the rest of the classes tailored to the menu attached to one of the VR hand controllers, like SubMenu and MenuWithTabs et.c.
EnvironmentMenuWithTabs with CellexalButton can be used to construct other menus that floats freely in the VR environment.
To create a button of your own, make a new gameobject and attach some sort of renderer (usually MeshRenderer or SpriteRenderer), some sort of collider (usually we stick with BoxCollider). If one of the parent gameobjects to your button gameobject does not already have a Rigidbody component, attach one to your button, or one of its parents. Turn the collider of your button into a trigger if desired, and make sure the button gameobject is on the EnvironmentButtonLayer layer. These are all the base components that the button needs to be visible in the environment and receive the appropriate events from Unity, now we can add our button script. If your button simply needs to call another function in a script that derives from MonoBehaviour, you can use CellexalSimpleButton and add your function in the OnActivate event in the inspector. If your button needs to do something more complicated, create a new class and have it derive from CellexalButton and put your code in the Click method.
5.2. Keyboards
The keyboards in CellexalVR's virtual environment actually predates the CellexalRaycast and CellexalRaycastable classes, but have been retro-fitted to use them. Each keyboard has its own KeyboardHandler, an abstract class that each keyboard extends, because most keyboards serve different purposes and have different layouts. The keys on each keyboard are automatically generated in the Unity Editor in the KeyboardHandler.BuildKeyboard() method. This method will look for any child gameobjects with the KeyboardItem component, and positions them according to KeyboardItem.position and KeyboardItem.size, creates a appropriate mesh for the key to use, and sets the material. The individual key gameobjects are not meant to be altered manually, you should use only KeyboardItem to change where keys appear on the keyboard.
6. The R scripts
The R package that CellexalVR uses is open source as well. The source code can be found here. The R scripts that CellexalVR uses are located in the Assets/StreamingAssets/R folder. These scripts don't contain much code themselves, they mainly just parse arguments and calls a function in the CellexalVR R package. Results are written to files which are then read by CellexalVR. If you are interested in changing or adding something to the R package I recommend forking it.
7. Adding a feature to CellexalVR
This section is only meant to showcase some tips if you want to add a feature to CellexalVR. Our workflow when adding a new feature to CellexalVR is usually something like the following:
7.1. Write some code
Depending on the feature, you may want to use the different objects already in CellexalVR. Some pointers are given here:
-
Most of the scripts that there is only one instance of can be accessed through the ReferenceManager. We highly suggest you add your classes to it if they should be used in other classes. The ReferenceManager is populated in the editor, go ahead and add a line in the
ReferenceManager.AttemptSetReferences()to make it add it automatically when you press "Auto-populate references" in the inspector. -
Getting a reference to the ReferenceManager itself can be done through the static field
ReferenceManager.instance. -
The graphs can be accessed through
Dataset.Graphswhich returns a list of Graph objects. The points that make up the graphs can be accessed throughGraph.points. -
The graphs can be colored by calling
Graph.ColorGraphPointGeneExpression()orGraph.ColorGraphPointSelectionColor()for each graph point, orCellManager.ColorByGeneExpression()to color all graphs. -
R scripts are run by calling the
RScriptRunner.RunRScript()function. This function takes two arguments; a file path the R script that you want to run, and a string of arguments to pass along. In order to run the R scripts asynchronously, they should be run in a separate thread. You may then create a Coroutine that waits for the thread to finish and then you may read the results. An example is given below:public void RunMyRScript() { StartCoroutine(RunMyRScriptCoroutine()); } private IEnumerator RunMyRScriptCoroutine() { // file path to your r script string rScriptFilePath = Path.Combine(Application.streamingAssetsPath, "R", "my_amazing_r_script.R"); // the arguments that your r script expects string args = "arguments are seperated by spaces"; Thread t = new Thread(() => RScriptRunner.RunRScript(rScriptFilePath, args)); t.Start(); while (t.IsAlive) { yield return null; } // R script finished! // TODO: Do things with the output }
-
All buttons on the main menu inherit the CellexalButton class. This class has two abstract members: a function
Clickthat is called when the button is clicked, and astringpropertyDescriptionwhich is the text that shows up above the menu when the button is hovored by the user. - For any other interactive elements, there is CellexalButton, CellexalRaycastable, ClickablePanel for receiving raycasts and creating elements that can be clicked or activated using the VR controllers. To make objects grabbable, we recommend you use OffsetGrab.
-
To synchronize a feature in a multiuser session, we use the MultiUserMessageSender and MultiUserMessageReciever classes. If your feature is invoked by pressing a button, let the
CellexalButton.Click()call your function and call a function in the MultiUserMessageSender, which sends a message to the MultiUserMessageReciever which calls the same function on the other connected clients' sides.
7.2. Test the feature
To test code we usually use our console feature. It can be summoned by pressing F12 when CellexalVR is running and the window is focused. To enable one of your functions to be run through the console, just add the ConsoleCommand attribute to it. An example is given below.
[ConsoleCommand("cellManager", aliases: new string[] {"colorbygene", "cbg" })] public void ColorGraphsByGene(string geneName) { // TODO: implement this function }
The example code above makes our function ColorGraphsByGene callable by writing either colorbygene or cbg in the console. Arguments to functions that are in the console can only be int, float, double, bool or string. Any other type of argument you will have to convert manually. The first argument to the ConsoleCommand attribute is the name of a field in the ReferenceManager. You have to add an instance of the script that the command is being run from there. This field is accessed through reflection when the command is typed in the console. If you want your command to able to be run correctly using the rcf command, you must invoke the CellexalEvents.CommandFinished event when it has finished. If your command reads a file, you may press tab to autocomplete the filepath. By default this gets files from where CellexalVR is installed, or where the project root is if your running in the editor. You can also use the folder argument to the ConsoleCommand attribute to change which folder the filepath should be relative to.