Getting started
This guide explains how to install and set up CellexalVR. Start by going to the download page to download CellexalVR. Before CellexalVR can be used, you must set up an HTC Vive and R. When you're done setting it up it could be a good idea to either read at least a little bit of the manual or if you don't like reading check out the videos at the video guides section.
1. The Hardware
CellexalVR requires a pretty powerful PC to work. We recommend you use a desktop machine with some specifications equivalent to an Intel i7 processor and an Nvidia GTX1080 graphics card. CellexalVR supports any headset that is compatible with the OpenXR runtime, such as the HTC Vive, Valve Index or HP Reverb G2.
CellexalVR only runs on Windows 10.
2. Setting up the Headset & Controllers
We recommend using the HTC Vive, Valve Index or HP Reverb G2, as these headsets are what CellexalVR was developed alongside. CellexalVR supports any headset that is compatible with the OpenXR runtime. Depending on which headset you have, the setup can be slightly different but whichever one you have will most likely come with instructions on how to set them up.
Click here for help on how to set up the HTC Vive
Click here for help on how to set up the Valve Index
Click here for help on how to set up the HP Reverb G2
The HTC Vive and Valve Index requires Steam VR, and the HP Reverb G2 requires Windows Mixed Reality Portal. The headsets' setups should install this for you automatically. For Steam VR we recommend you run the room setup (right click the Steam VR icon in the task bar and then click "Room setup") follow the on screen instructions and for Windows Mixed Reality we recommend you run the Room Boundry set up.
If you've been using multiple headsets on the same machine you might need to switch the OpenXR runtime. This seems to sometimes happen automatically, but not always. If CellexalVR does not automatically start SteamVR or Windows Mixed Reality, start it manually.
To switch the runtime to SteamVR, go into the SteamVR settings, make sure advanced settings is shown, go to the developer section and click the "Set SteamVR as OpenXR runtime" button.
To switch to Windows Mixed Reality, start Windows Mixed Reality, a grey popup should appear at the top of the window stating the problem, press the "Fix it" button.
3. Setting up the R package
CellexalVR assumes you have at least R 4.0.0 installed. If you do not, install it from here. Older versions of R have not been tested properly with the most up to date version of cellexalvrR.
Once R is installed you need to install the CellexalVR R package. Open up an R terminal as an administrator by right clicking the executable (R.exe) and pressing "run as administrator". The R session needs to be run as an administrator in order for the package to be installed system wide, and not just locally.
If you do not have the devtools package installed you can install it by running the following command:
install.packages("devtools")
Rtools read more here.
Once devtools and Rtools is installed or if you already had them installed, you should run the following commands:
library(devtools)
install_github("sonejilab/cellexalvrr")
After some time the CellexalVR R package should be installed.
4. Installing Pandoc for creating HTML reports
Analysis made inside a CellexalVR session such as heatmaps, transcription factor networks and screenshots can be saved and compiled into a HTML report (read more here). To be able to do this the document converter Pandoc needs to be installed. Find the installation link here: Pandoc install.
5. Preparing your data
Your data needs to be processed by the CellexalVR R package before it can be loaded by CellexalVR. How to do just that is explained in our R tutorial.
If you want to try an already prepared dataset you can find some examples at the download page.
6. Installing CellexalVR

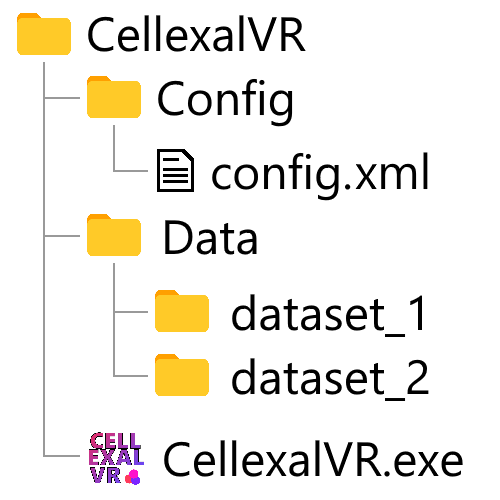
For more information on how to download CellexalVR, see the download page. Once you have downloaded the zip archive, unpack it anywhere on you computer. You should see a folder called Data in the folder where the CellexalVR executable is, place your data exactly as the R package formatted it inside a new folder inside the Data folder. The image on the right shows you this folder structure.
7. Setting the R path
To access the R package we have installed we need to tell CellexalVR where it can find the R installation. When launching CellexalVR you will see a start menu. In this start menu there is a field to add the path to your R installation. You will only need to do this once unless you move the R installation to a new location or install a new version somewhere else.
Or if you prefer, you can always open up the config.xml and change it there, find the line that says
<RscriptFilePath>REPLACE THIS TEXT WITH PATH TO R EXECUTABLE</RscriptFilePath>
and change it to the path to your RScript.exe, (note: not necessarily exactly like this):
<RscriptFilePath>C:\Program Files\R\R-4.0.0\bin\x64\Rscript.exe</RscriptFilePath>
Once you are finished setting up. Head on over to the manual to learn about the different possibilities. Or if you're feeling confident just launch CellexalVR and jump directly in and get started.